You know that warm, inviting smell that lingers through the kitchen when your grandma is baking up a delicious apple pie? Imagine if you could roll those flavors into a cake and get the best of both worlds. Mind blown!
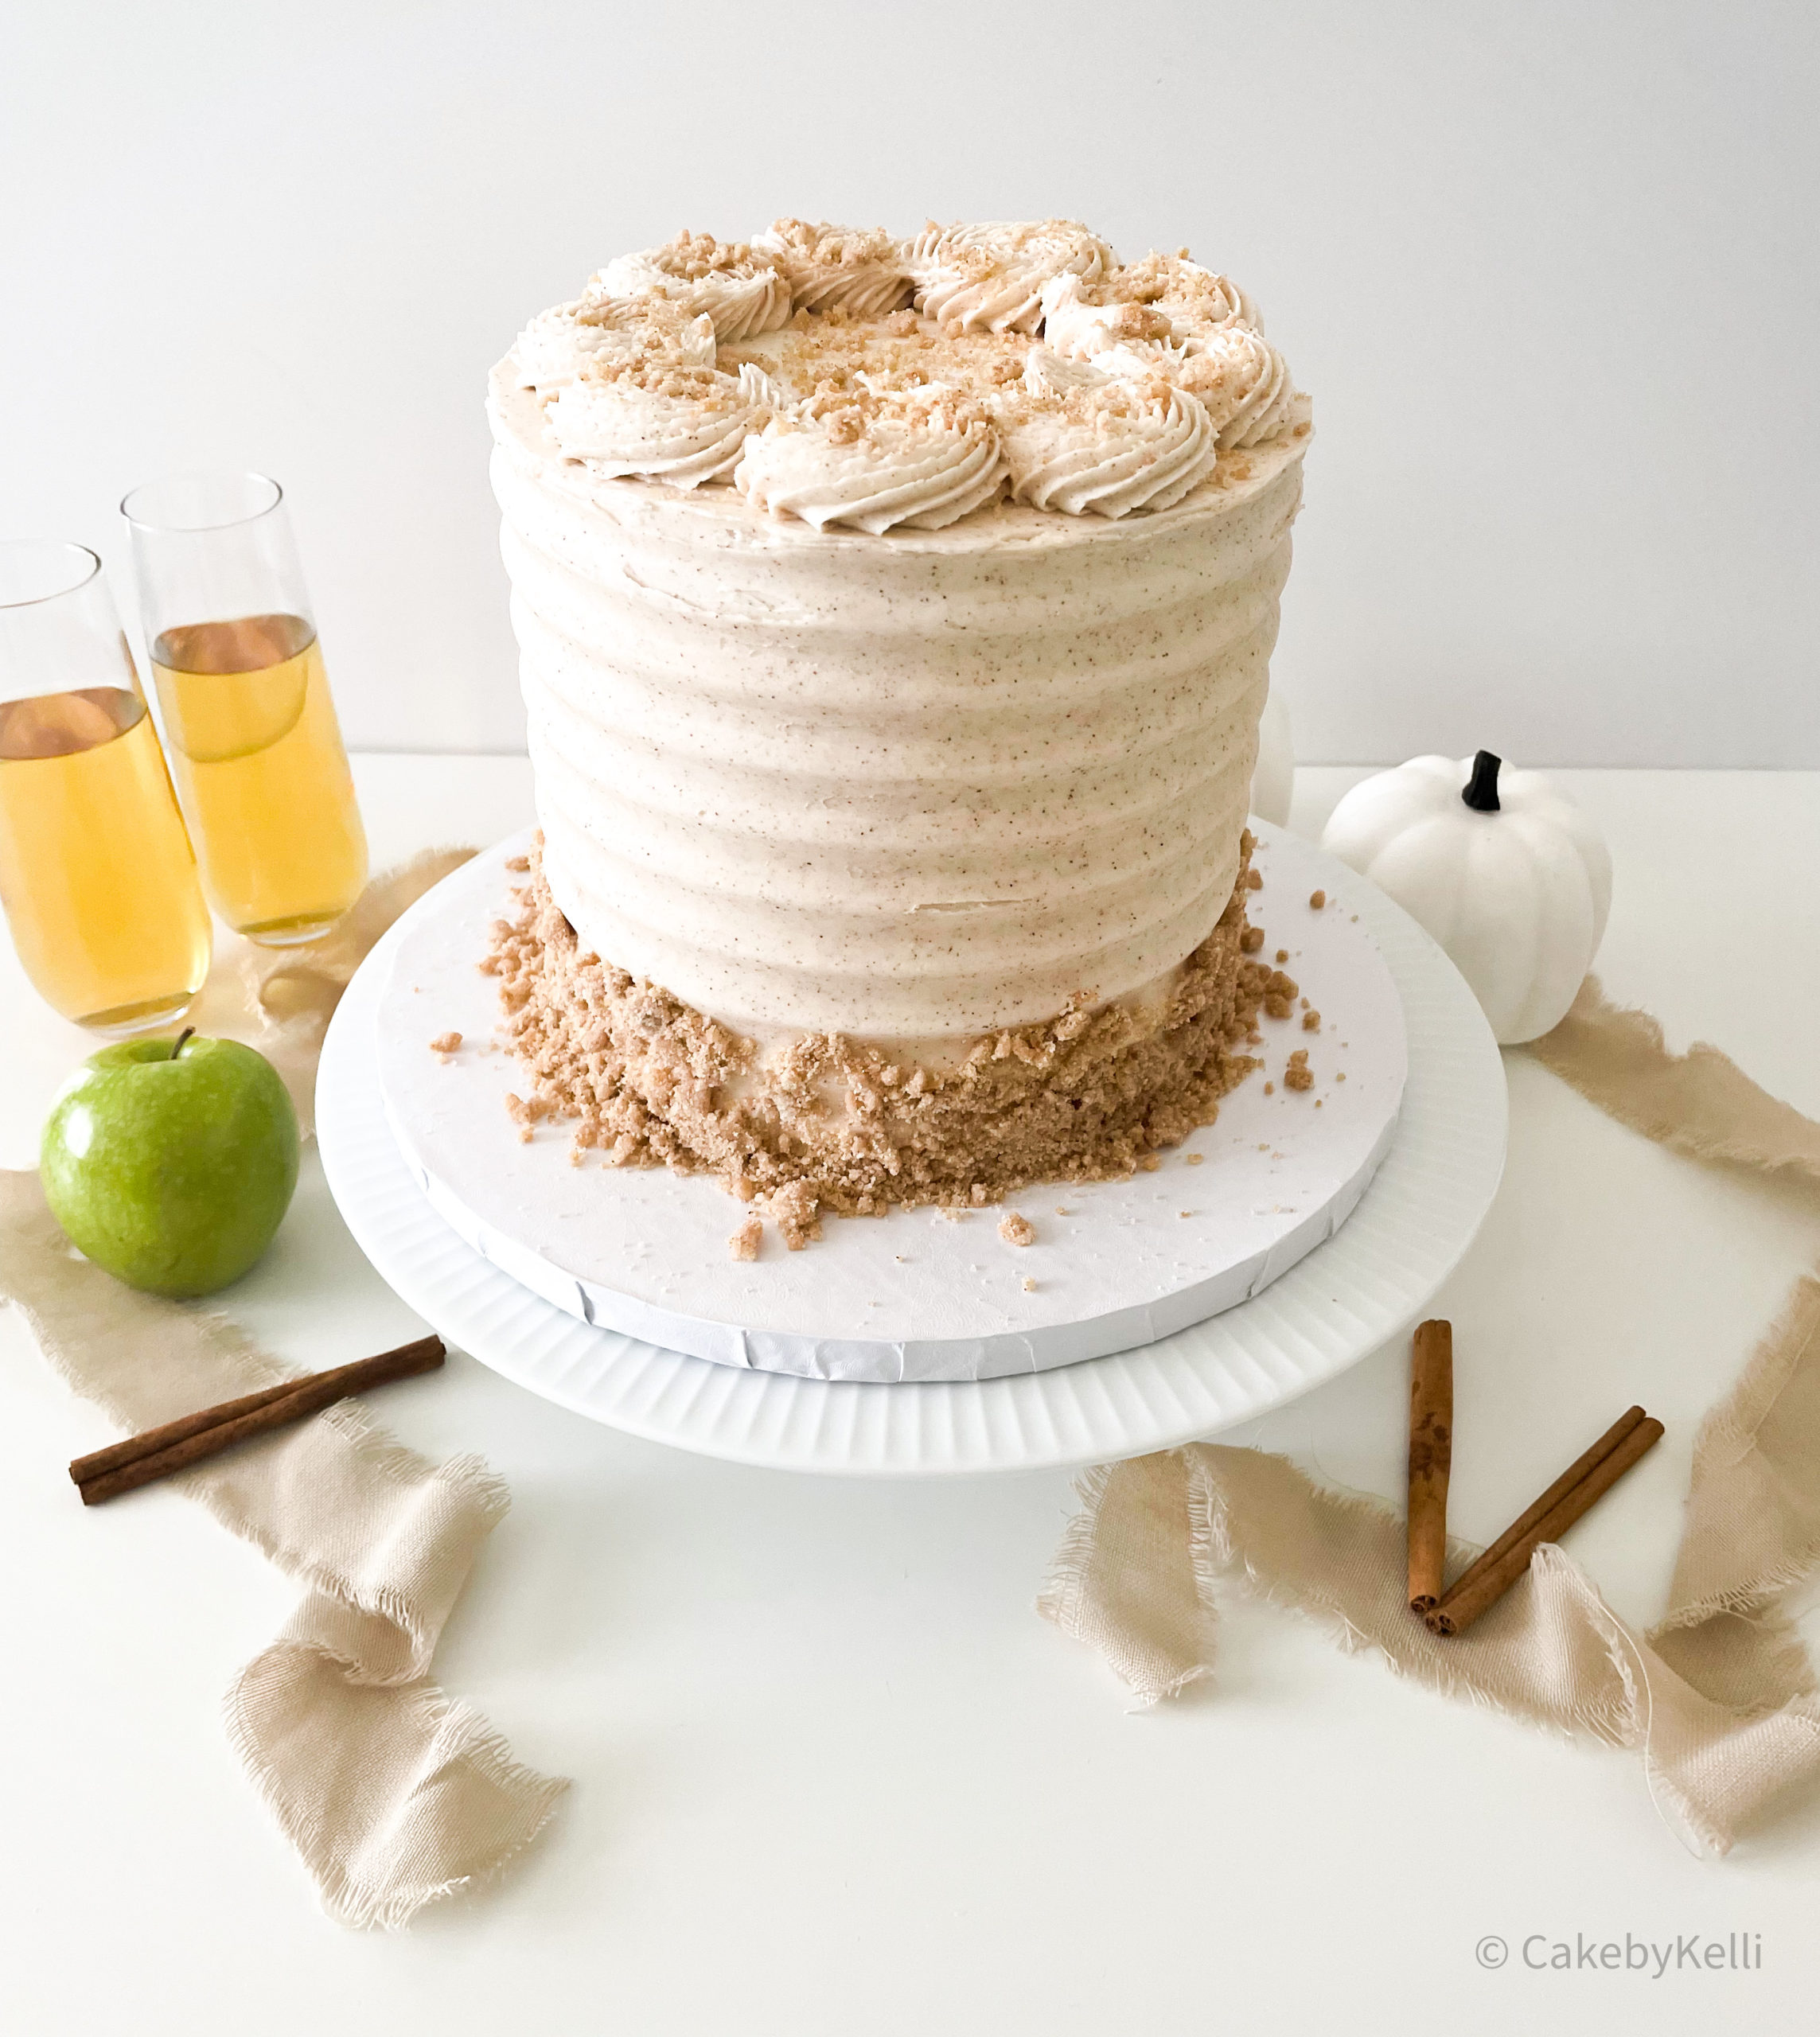
Do you know the difference between classic apple pie and Dutch apple pie? The main difference is the delicious crumble topping that Dutch apple pies are known for. The crumble is made from a combination of butter, flour and sugar and it adds the perfect crunch to this delectable cake. Cinnamon cake layers, apple pie filling, Dutch apple crumble baked into the cake layers and sprinkled on top sealed in with sinfully sweet cinnamon buttercream makes this the perfect dessert for fall baking.
There’s one more thing that makes this Dutch apple layer cake even better, and it’s the way it bakes. The cake layers bake up so evenly and flat, so no cake top cutting required! The texture of this cake is so light and airy, and the bits of Dutch apple streusel sprinkled throughout add this delightful little crunch that offsets the apple pie filling so perfectly. It’s truly such a delicious cake!
When it came time to serve this cake, I poured a glass of fresh apple cider to enjoy alongside my freshly baked cake slice. It would make such a fun day to go apple picking to hand pick the apples for this cake, as well as pick up some fresh apple cider. There’s nothing better than that on a brisk fall day!
Notes for making the Dutch apple streusel topping:

You would think that the apple pie filling would be the showstopper to this cake, however the secret weapon is truly the Dutch apple streusel topping. This is the easiest part of this cake to make and it is 1000000% worth it! Once you have this recipe, you can save it and use it to sprinkle on top of bread, muffins, pies, cakes, and other pastries. It will become a staple in your kitchen once you’ve tasted its sweet crunchy deliciousness.
Now, depending on how much streusel you prefer, you have some options when preparing your Dutch apple cake. I personally LOVE it, so I sprinkled it on the bottom of my cake pan to form a sort of crust for each of my cake layers. Then I added my cake batter to my pans then added a few more sprinkles of the streusel on top of each cake pan to bake some of it directly into the cake layers. To top it off, I sprinkled some remaining streusel on both the top and on the sides of my fully frosted cake to really seal the deal. So yes, it’s safe to say I’m slightly addicted to streusel!
Now, we all know that its technically unsafe to eat uncooked flour. This is because flour is a raw food, which means it hasn’t yet been cooked or treated to kill any harmful bacteria. This usually isn’t an issue because most foods we consume only contain cooked flour. So before you add the extra streusel topping to your cake as a decoration or underneath the apple pie filling between the cake layers, you’ll need to make it safe for consumption by heat treating it. This is super easy – spread the streusel out onto a single layer on a piece of parchment paper on a baking sheet, and bake it for 15 minutes, stirring the mixture every 5 minutes to ensure that it bakes evenly.
Tips for making the apple pie filling:

- This recipe will make about 4 cups of filing. If you don’t want to make that much, you can most certainly half or third the recipe.
- You won’t need quite this much to fill your cake, however I highly recommend warming up the leftover filling and scooping an additional serving alongside each cake slice as you are serving it. Maybe even with a scoop of vanilla ice cream if you are feeling indulgent!
- When it comes to making apple pie filling at home, you have a few different options of the type of apples to use, depending on your taste. I always prefer to use green apples like Granny Smiths, as I feel like the tartness is such a wonderful mixture with the sugar and spices.
- My second favorite combination to use is a mixture of Granny Smith apples and Honeycrisp apples.
- When you are preparing the apples, be sure to be as consistent as possible when cubing them. You can also slice them if you prefer, and if you do, then I recommend making them no thicker than about ¼ inch thick. We need them to soften, and the thicker the slices are the longer and more difficult that will be. The more evenly sliced the apples are, the more evenly they will cook.
- I do not include butter in the recipe, however if you are looking for a richer filling you can most certainly add a small bit of butter for that extra flare.
- This recipe calls for equal parts granulated sugar and brown sugar. I typically tend to use light brown sugar more often than dark brown sugar, however either option will work.
- Be sure to let the filling cool completely before storing. Once fully cooled, you can place the filling in an air-tight container, such as a tupperware or mason jar and store it in the fridge for up to three days. It’s highly unlikely that it will last that long anyways because it is so delicious you can eat it straight up with a spoon! (One of my favorite quick uses for leftover apple pie filling is overnight oats, which I’ll be whipping up as soon as I’m done writing this blog post. Yum!)
- The filling will firm up a lot as it cools, so don’t worry if it seems runny as you are finished preparing it.
- If you are in a pinch, you can opt to use canned apple pie filling instead.
What you’ll need for baking and preparing the ingredients:
- 3 6” cake pans
- Large mixing bowl
- Smaller mixing bowl
- Baking sheet
- Parchment paper
- Measuring cups and spoons
- Stand mixer with paddle attachment or electric hand mixer
- Spatula
- Mason jar or tupperware to store leftover Dutch apple streusel topping and apple pie filling
- Large saucepan
- Whisk
- Apple peeler (optional)
- Fork (for mixing the streusel topping)

What you’ll need for decorating the cake:
- Turntable
- Offset spatula
- Cake scraper
- Note: I consider these items the big three! These are the first items I always recommend for beginner cake decorators. You can find all of them for reasonable prices on Amazon, you don’t need to spend the big bucks on fancy supplies to make a beautiful cake!
- Decorated cake scraper (optional)
- #6B piping tip (optional)
- Piping bags or Ziploc bags
- Cake board / drum
- Non-stick mat

Tips for filling and stacking this cake:
- Since this cake has a soft filling, a few additional precautionary measures will need to be taken to ensure it doesn’t sink or tip over.
- Add a thin layer of buttercream to the top of each cake layer, then pipe a buttercream dam around the outer edge of your cake layer. This will be used to help hold the soft filling in place. Often times I will make two or three dams to make it extra secure.
- Dollop the filling into the center of the buttercream dam you created and gently spread it. Don’t be afraid to go light with the filling, as you can always add an extra scoop on the side when serving, however if it starts to ooze out of the sides of your cake when frosting it, the only option you have is to deconstruct and start from the beginning.
- Once you’ve added your soft filling between all the layers, I recommend popping the cake in the fridge or freezer for 10 mins to help the filling stiffen up. This will give you a bit more time when crumb coating and final coating your cake.

Notes for decorating this cake:
- For this Dutch apple layer cake, I wanted to add the heat treated streusel topping to the outside and the top, along with some additional piping work and a fun decorative cake comb. How you decorate the cake is completely up to you, however if you’d like to decorate it in a similar way to mine I will walk you through the steps here.
- Add your final layer of buttercream to the outside of your cake. When using a decorative cake comb, it’s always safe to make the layer of buttercream a tad bit thicker since you’ll be scraping more off than usual as you go.
- Once you are satisfied with the final layer, while the cake is still at room temperature, gently use your hands to press the Dutch apple streusel topping along the outside edges of your cake.
- Add a few dollops of leftover buttercream to a piping bag fitted with a 6B piping tip. Starting at the edges, gently apply pressure while you are swirling your piping bag and lifting upwards to create a fun piped design around your cake top. Continue to make your way around the entire edge of the cake until you’ve covered it completely.
- Lastly, sprinkle a bit more Dutch apple topping along the top of your cake and voila! You’ve officially created a delicious, beautiful cake!

Tips for making the cake in advance:
- I always recommend breaking up cake making steps into multiple days so the task itself stays fun and doesn’t become daunting or too time consuming. Luckily for this cake (and for nearly all my cakes) you can make everything in advance!
- The Dutch apple streusel topping can be made up to 3 days in advance. Store it in an air-tight container at room temperature until ready to use.
- The apple pie filling can also be made up to a week in advance. Once cooled, add it to a mason jar or airtight container and keep it in the fridge. You can also freeze the topping if you’d like to store it longer and save it for the holidays.
- The buttercream can be made up to one month in advance. Once it’s prepared, place it in an airtight container in the refrigerator and perform the same steps with writing the flavor and the date.
- The cake layers can be made up to three months in advance. Once the cake layers are completely cooled, wrap them tightly in plastic and then in foil. I prefer to write the name of the cake flavor and the date in a marker on the foil prior to putting it in the fridge so I can keep track of it.

Tips for storing the cake:
- After the cake has been fully frosted and decorated, it is safe to leave it at room temperature or in your fridge for a few days. If you leave it in the fridge, be sure to give yourself plenty of time to let it come to room temperature again prior to slicing into it.
- I always decorate my cakes the night before any event and let them chill in the fridge overnight and they always turn out great!
- Once you’ve sliced into it and there are still leftovers, you have a few options for storing:
- Once the cake is sliced, the cake layers are no longer protected by buttercream and will dry out quickly. To prevent this, you can
- Add another thin layer of buttercream to the exposed cake layers (basically, re-frost the now exposed cake) and place it back in the fridge until ready to serve. I only recommend doing this if you plan to eat the entire cake within a few days of making
- You can cover the exposed cake in plastic wrap and place it back in the fridge
- You can cut the remaining cake into slices and wrap each slice individually tightly in plastic wrap and place it in the freezer. Cake slices wrapped in plastic wrap will keep in the fridge for at least three months!
- The night before you want to enjoy another slice of cake, bring it from the freezer into the fridge and the following day let it thaw at room temperature prior to enjoying.
- Once the cake is sliced, the cake layers are no longer protected by buttercream and will dry out quickly. To prevent this, you can


Dutch Apple Cake
Description
Fluffy cinnamon cake layers with homemade streusel topping baked in, sinfully delicious cinnamon buttercream, sweet apple pie filling and Dutch apple streusel topping makes for a warm and inviting fall flavored cake.
Dutch Apple Streusel Ingredients
Cinnamon Cake Ingredients
Apple Pie Filling Ingredients
Cinnamon Buttercream
Dutch Apple Streusel Topping Instructions
- In a medium bowl, combine the flour, sugars, and cinnamon together.
- Slowly drizzle the butter into the bowl while stirring the crumbs with a fork.
- If crumbs do not form, add an additional tablespoon of butter until you get your preferred crumb texture.
- Be careful not to over-mix. If you do, this will eventually turn into a dough and we want to keep it crumbly.
- To heat treat it, spread the mixture evenly over a baking sheet on top of a piece of parchment paper. Preheat your oven to 325 degrees Fahrenheit and bake the streusel for 15 minutes in 5 minute intervals, stirring every 5 minutes to ensure all sides of the topping bake evenly.
- Store it in an airtight container at room temperature until ready to use.
- Preheat oven to 350 degrees Fahrenheit
- Spray 3 6” round cake pans with baking spray (I prefer Pam’s no-stick baking spray).
- In a large bowl, mix together all the dry ingredients and set aside (flour, baking powder, cinnamon, salt).
- In your stand mixer fitted with the paddle attachment, add your room temperature butter, oil and both sugars and mix until light and fluffy (2-3 minutes).
- Beat in the eggs one at a time on medium speed, scraping down the sides of the bowl as needed.
- Add the vanilla extract and beat until combined.
- With the mixer on low speed, beat in the buttermilk and the flour mixture in three additions, starting and ending with the flour mixture.
- Divide the batter evenly between the three prepared cake pans (I highly recommend using a kitchen scale to measure the batter) and bake for 34-38 minutes, until a toothpick inserted in the middle comes out clean.
- Cool on wire rack for 15 minutes.
- Turn the cakes out of the pan onto the wire racks to cool completely
- Wash and peel your cubed apple slices and place into a large bowl. Drizzle lemon juice over the apples to fully coat them, and set aside.
- In a small bowl, whisk together the water and cornstarch until fully combined and smooth.
- Add the water and cornstarch mixture to a large saucepan along with the granulated sugar, brown sugar, cinnamon, vanilla extract and nutmeg.
- Bring the mixture to a simmer, stirring occasionally.
- Then bring the mixture to a boil and cook for one minute, stirring constantly until it thickens up.
- Once the mixture has thickened, turn down the heat and add in the apples and stir to completely coat the apples.
- Turn the heat back up to high and bring the mixture to a boil again. As soon as it starts boiling, reduce the heat one last time to a medium/light simmer and let the apples cook until they become soft and tender (about 10-12 minutes).
- Remove from heat and let the filling cool completely prior to using or storing. The mixture will continue to thicken as it cools.
- In your stand mixer, beat the room temperature butter on high until light and fluffy.
- Turn your mixer onto its lowest speed, and slowly start adding your powdered sugar, cup by cup.
- Once your butter and sugar are fully combined, add the vanilla extract and cinnamon and mix to combine.
- Lastly, add the heavy whipping cream and beat until fluffy.
- If your buttercream seems too stiff, add another splash of heavy whipping cream. If your buttercream seems too runny, add a bit more powdered sugar to balance it out.